We benchmark LLM inference on one Google TPU v6e-4 host (four chips, one VM) with four chips in one VM. We use vLLM 0.20.0 with the tpu-inference backend and an fp8 KV cache.
We test three Qwen3 models:
Model
Type
Params
Parallelism
Chips
Qwen3.5-4B
dense
4B active
tp1
1
Qwen3-30B-A3B
MoE
30B total / 3B active
tp4
4
Qwen3-32B
dense
32B active
tp4
4
We measure three parts of inference: prefill, decode, and end-to-end online serving.
Disclaimer: this article is not arguing that TPU is worse than GPU. TPU and GPU each have their own fit, and which one wins depends on the specific workload. My point is that the batch of comparison data currently circulating online is itself inaccurate, much of it AI-fabricated and impossible to trace. What I’m taking apart below is exactly that fake data.
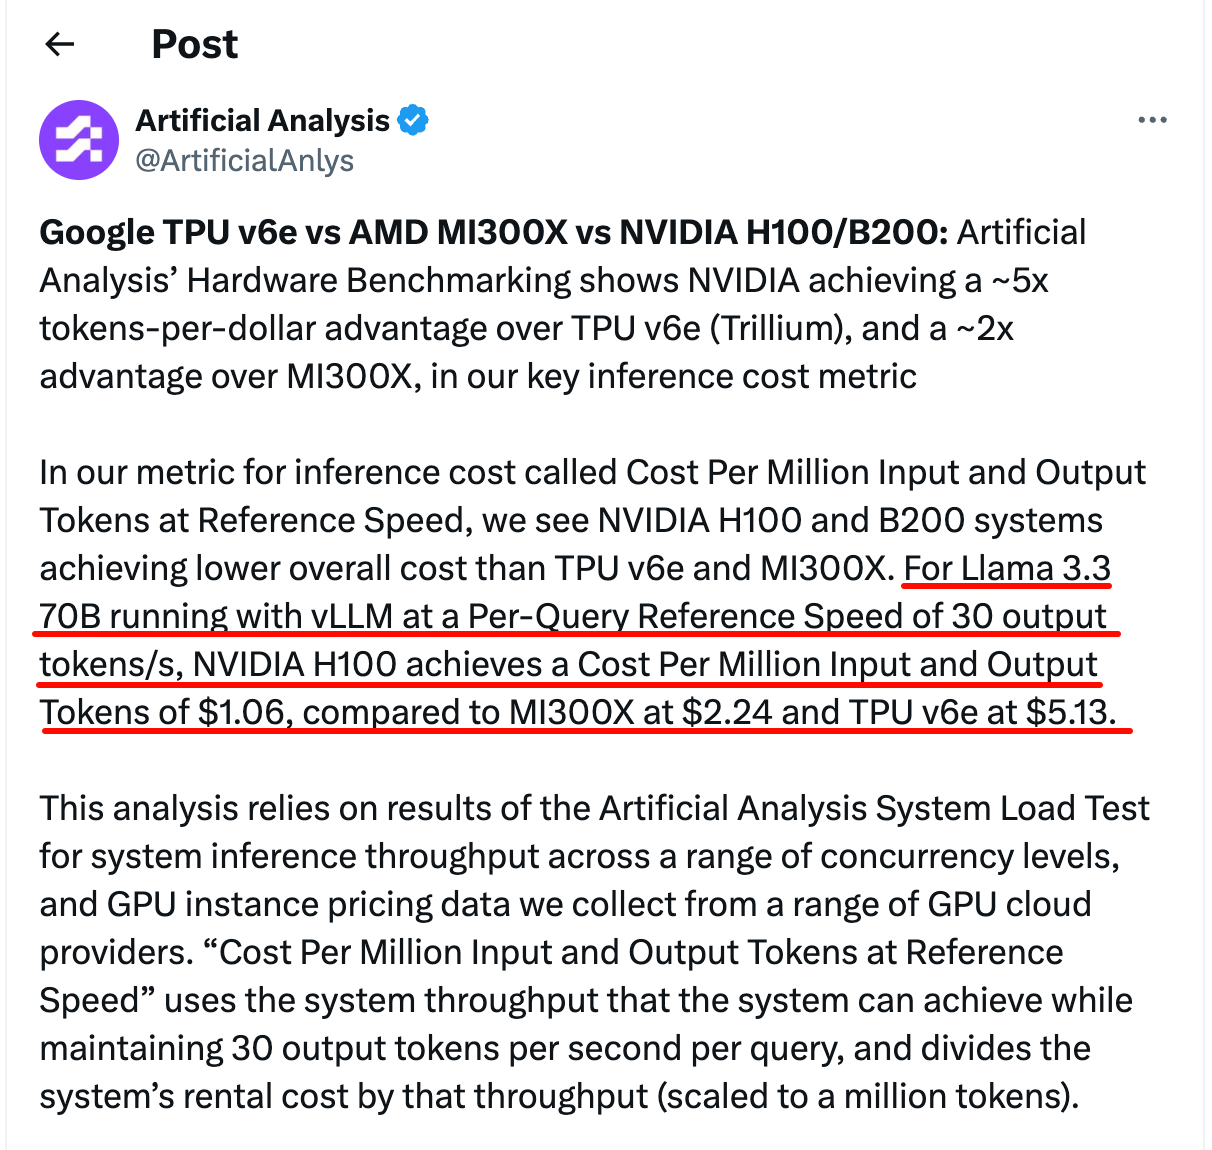
Artificial Analysis recently released a set of hardware benchmarks1. Using Llama 3.3 70B, vLLM, and a reference speed of 30 output tokens/s per query to compute the cost per million input/output tokens, NVIDIA has roughly a 5x per-dollar token advantage over TPU v6e (Trillium), and roughly a 2x advantage over AMD MI300X2.
The hardware benchmark conclusion Artificial Analysis posted on X. NVIDIA has about a 5x per-dollar token advantage over TPU v6e and about 2x over MI300X. H100 is $1.06, MI300X is $2.24, TPU v6e is $5.13.
Alongside this reproducible data, another kind of thing is also circulating online.
introl has an article titled Google TPU v6e vs GPU: 4x Better AI Performance Per Dollar3. Its core argument is that TPU has 4x better performance per dollar than H100, and that TPU completely beats NVIDIA on inference economics. Its key data comes from another article, ainewshub.org’s Nvidia vs Google TPU 2025 Cost Comparison4. Follow this citation chain down and you find that both are AI-generated, and the data is made up.
claude works fine in my terminal — Team Account, auth, everything. Open tmux, run claude, and it wants me to log in again. Took a bit of digging to figure out it’s a macOS Security Session thing.
AI coding assistants are everywhere now, from chat windows to CLI Agents. After using a bunch of them, my biggest takeaway is: no single Agent is the best at everything.
I mainly use Claude Code, Google Gemini CLI, and Moonshot Kimi Code day-to-day. At first I treated them as standalone tools, but soon realized that was a waste — each has distinct strengths, and if you let them collaborate and delegate tasks based on those strengths, the results are much better. I call this approach Agent Mesh.
In containerized deployments, sometimes you need all outbound traffic from a container to go through a specific network exit. Tailscale’s sidecar pattern makes this possible: a Tailscale container acts as a sidecar, other containers share its network namespace, and traffic flows through a WireGuard tunnel via a remote exit node.
This setup is well-documented for Docker Compose, but migrating to nerdctl (containerd) introduced a series of pitfalls. Here’s what I ran into so others can avoid the same traps.
In early 2026, at the “INTO THE MODERN” Impressionist exhibition in Singapore, I stood before an original Monet for the first time.
Layers of pigment were stacked high, brushstrokes clearly visible, as if freezing a moment of shimmering dawn or fading dusk from a century ago. At that moment, my mind drifted back to a quiet Sunday exactly ten years prior (2016). I was sitting in front of a computer, flipping through images on the screen one by one, selecting paintings to present for my art class. The theme was “From Tradition to Modernity.” At that time, the word “Impressionism” was still foreign to me, and I could never have imagined that one day I would come face to face with these masterpieces that had once only existed for me as pixels.
My long‑serving Raspberry Pi 4B has finally met its “successor” — the compact Intel NUC. From ARM to x86, from a TF card to an SSD, this seemingly simple hardware upgrade has brought a qualitative leap to my tinkering experience.
As we all know, once keycaps get greasy and shiny (“oiled”), it’s almost impossible to restore them by simply wiping. I once tried sanding the keycaps, but not only did it make things worse, the plastic debris also fell into the gaps between the keys. (You can see my sanded Shift and Space keys in the photo — they look terrible.)
While some say you can go to an Apple Store to get them replaced1, it’s said they only allow a few keycaps to be replaced each time. For someone like me whose entire keyboard is shiny, DIY replacement is clearly the more practical option.
I’m writing this blog post because I found it incredibly difficult to locate a complete guide on how to replace MacBook Pro M1 keycaps. Most of the videos online2 only show how to remove regular letter and number keys — they deliberately skip over the longer keys like Space, Caps Lock, ESC, and the arrow keys. These keys have different internal structures and require a different disassembly approach.